
How to use OpenType features with Illustrator, InDesign and Photoshop
Photoshop, Illustrator and InDesign are ball leading design software, Photoshop being not only the top for advanced photo enhancements, but as Illustrator and InDesign with design for different purposes. Coming from the same creator (ADOBE), all three software are similar in their user interfaces, so it will be easy handle all the three software knowing the very basic tools.
Also if NOT ALL THE SOFTWARE SUPPORT THE OPENTYPE FEATURES, they're becoming very popular nowadays thanks to an always continuous evolving of software and fonts that need to respond to always more advanced requests from their users, but still many people are not totally familiar with those features.
If you want to learn in a more detailed way all the OpenType features available we suggest to read the Microsoft OpenType features page.
This 4 minutes simple video tutorial will explain the easier and quicker way to use some of the Open Type features in Illustrator, Photoshop and InDesign.
In the script below you'll find also a short description about the different kind of OpenType features available, specifically.
Software used: Adobe Illustrator CC Version 22.0.1 and Adobe Photoshop CC Version: 19.1.1
How to open the OpenType panel in Illustrator and InDesign.
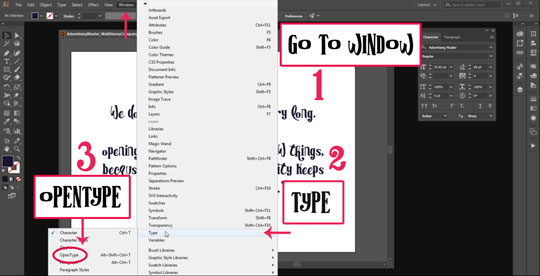
Let's start opening the OpenType panel in Illustrator.
The process is exactly the same to open the Character panel, which is the panel that allows you to select the fonts to use and gives access to the tools for text formatting customization.
Go to "WINDOW" icon on the top menu, and select "TYPE" from the drop-down list and "OPENTYPE". (or Character if you still don't have the Character panel visible)
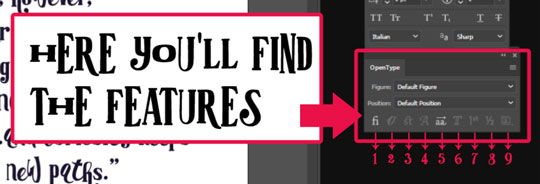
This is how the "OpenType" panel looks like and you can see different features options at its bottom. These sub options more or less define the broad style your creation is going to have and we're going to explain them a little further in a moment.
Features available in the OpenType panel and what they are in particular.
Let's introduce, with a short description, any of the features available in the OpenType panel:
- Standard Ligatures: Let's start explaining what a "Ligature" is. Ligature is the term used to classify a glyph when two or more characters are shaped and unified together in order to give to the new "solution" a more readable version. That's useful when two characters, like "fi", "fl", and "ff" (the most common ligatures) often are not well matched due the shape of the letters itself.
- Contextual Alternates: This kind of alternates are, like the stylistic ones, variants of the original glyphs but with the difference that in this case the veriations will be selected in automatic from the software on the basis on the closer characters.
- Discretionary Ligatures: This kind of ligatures usually are not created for readability purpose, but more for "graphic" and "ornamental" reasons.
- Swash: Swashes are glyphs which include fancy and decorative elements that usually remind to calligraphy handmade curls or ornamentals prolungation of some part of the letter.
- Stylistic Alternates: Alternates are glyphs with a stylistic variation compared to the original letter. This feature will help to give you more "flexibility" when working on a layout and to select the more appropriate alternate on the basis of its purpose. You may need a more curly version of the letter, or a slighly more informal one. The alternates available can help giving a different visual effect to the whole text or to a sigle word.
- Titling Alternates: The glyphs set for this feature are usually graphically designed, shaped and spaced for bigger all-capital titles.
- Ordinals: This feature is used to create "Ordinals", that's the way we give "an order" to a thing, one after another. A few example are the “st”’ in 1st, “nd” in 2nd, "rd" 3rd, etc...
- Fractions: This feature usually include a "more compact" or ri-elaborated version of a fraction compared to what it is when typed normally. Most of the time fonts include aready a ri-elaborated version of the basic fractions like 1/2, 1/4 and 3/4, try to type them and you'll see if they look like in this text, or with a different style.
- Stylistic Sets: This feature is still not very well known, but we bet it will be soon! Using the Set funcion allows to get more than one option of alphabet into the same font, so let's be sure to check this tool any time we buy a font, maybe we're missing most of the font!
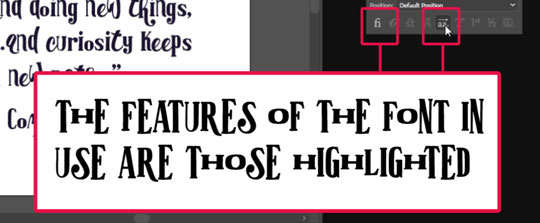
The features of the font style currently in use are conveniently highlighted in the sub menu.
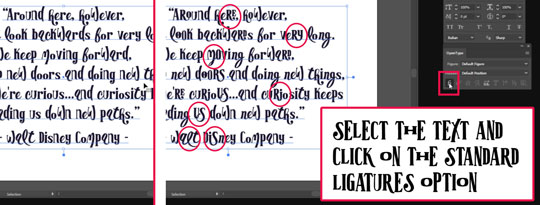
Let's start using a few of these features. After selected the text, click on the "Standard Ligatures" feature to see instantaneously how it treat your text.
Like you can see from the example below, the Standard Ligatures available will be shown in your text, we've highlighted some of them to make it easier for you to see the differences.
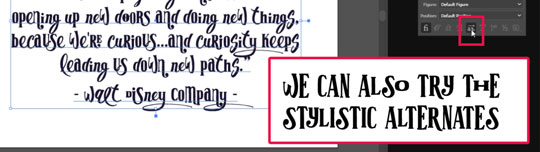
We can also try the Stylistic Alternates feature clicking the related button to see how the text change.
This button actually will only show you the first available alternate, but we'll see now how to get access the whole set of alternates in the easier and quicker way.
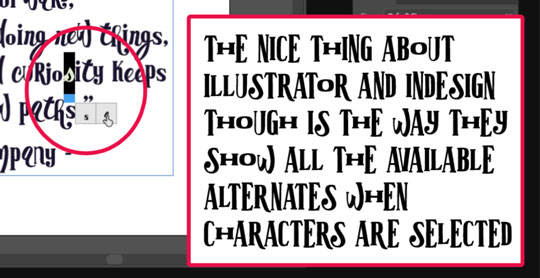
How Illustrator and InDesign make our "Stylistic Alternates" selection easier.
Point to be noted here, and this is where both Illustrator and InDesign make our designer-life much easier, is how they show all the available alternates when characters are selected!
So all you have to do is selecting the letter you'd like to change and just click on the visual preferences available in the little underlying preview and instantaneously you can see how the character changes its style.
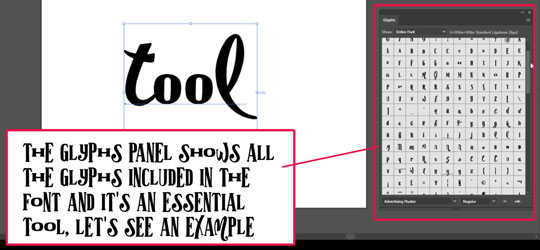
Introducing the Illustrator Glyphs panel and its advantages.
To open the Glyphs panel, like you did before for the OpenType one, go to WINDOW on top menu, then select TYPE and GLYPHS.
The GLYPHS panel displays all the glyphs available for a particular font, and is therefore an indispensable tool, let's see why.
If we take the text below as example, selecting the whole text and activating the "Standard Ligatures" feature, it would show the first option available for that specific word.
But this is clearly not the result we want.
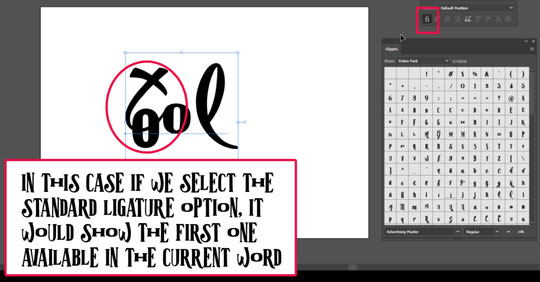
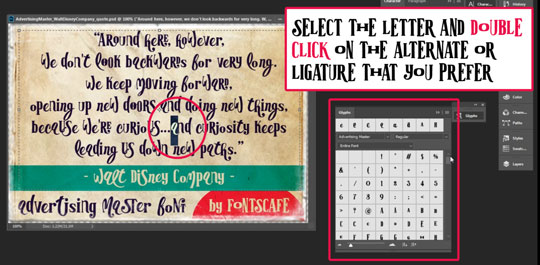
The advantage of the Glyphs panel is just the possibility to check in advance all the glyphs available in the font which will give us the chance to make a selected choice of the letters we may want to change.
In this specific word, for instance, we may decide to change the initial "to" with the second option available in the panel, or to change the "oo" in the middle of the word that's actually the choice we made in this case.
After selecting the letters, you can either click the "Standard Ligatures" button or select it directly, with a double click, from the Glyphs panel.
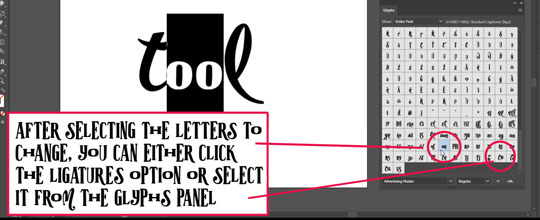
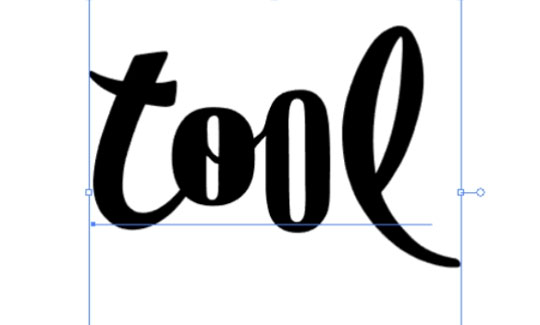
This is what the result will be with the selected Ligature.
What's different in Photoshop?
Photoshop and Illustrator share many of the same features, like you can see comparing their "Character" panel, but in Photoshop the alternates available for selected characters aren't shown as they are in Illustrator.
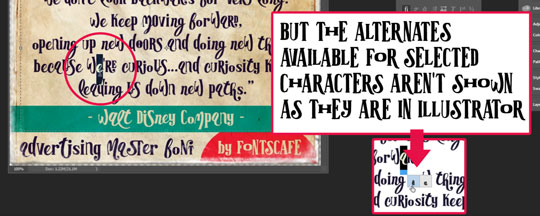
So the glyphs panel comes to be the easier way to access OpenType features in Photoshop.
To open the Glyphs panel in Photoshop go to WINDOW on top menu, then select GLYPHS.
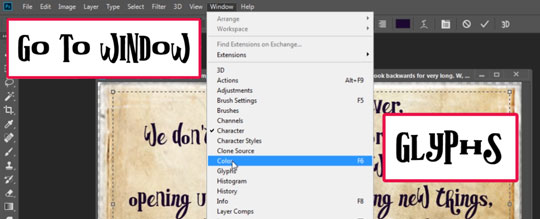
The Glyphs panel in Photoshop works exactly like the one in Illustrator, so it will give you a preview of all the glyphs available in the font and the possibility to decide on which letters to focus.
After selected the letter/letters a double click on the Alternate or Ligature preferred between those in the panel will be enough to generate the change.
We hope you enjoyed this tutorial and that it has been useful to you.
If you think this tutorial could be useful to a friend, a collegue or if you know anyone that could be interested to learn more about OpenType features,
...or if you just want to make us happy after the long work we did for you :P
please SHARE IT! :)
![]()
Fonts used in the tutorial:
Search


Photoshop, Illustrator and InDesign are ball leading design software, Photoshop being not...
At Fontscafe we know how busy you are, so we decided to create something for you that was...
Need an easy way to whip up some last-minute Christmas art?
Tada! The 100% absolutely "fre...
We've decided, in the spirit of Valentine's Day, to give away some beautiful Valentine's D...
!!!Updating October 2018:
You can find mow the "Free Chalkbard frames" directly in our "Su...