

Photoshop tutorial: How to create a texture and save it as pattern in the preset manager
This might seem like a very easy task for those who are experts with Photoshop tools, but there are a lot of beginners out there who are sure to appreciate having a simple tutorial that will help them learn some Photoshop tools in an easy step-by-step method.
Now, if you’re an expert, then you might be more interested in When fonts and Graphic Effects Come Together to Create a Vintage Layout - Photoshop Tutorial 01.
If you’re a beginner, however, this is one of the most helpful tools that will help you expand your creativity and give you wider options to elaborate on your layouts. So, let's learn more about this…
First create a new document a document.
Even though your pattern file could be something around 10px x 10px, create a bigger document. This will help you sort out the potential repetitive errors and figure out the rendering at full size.
Then, create a motif. In this case, it is a vertical black line that is 7 pixels wide, repeated several times.

Then, apply some noise and some blurring to this motif. Decrease the contrast, too, so that the the black lines turn dark grey and the white background turns light grey.

We carefully selected the pattern from this motif with a square selection (press shift while dragging to constrain to square). We selected this motif in order to include a black line on the left and a white line on the right. Now, the pattern is called “repeating”.
Go to Edit>define pattern and name it when prompted.
Now you have to test it. Create a new blank document and go to Edit>fill. Instead of selecting “foreground color" in the “content” drop box menu, select pattern. In the list at the end, select your new pattern. You should see if the repeating motif blends well.
You can check the scalability and different blending modes by creating a new blank layer, opening the layer styles menu and ticking the “pattern overlay". Play with it as needed.
You can now include it into “sets” by saving it through the drop down menus, as described above:
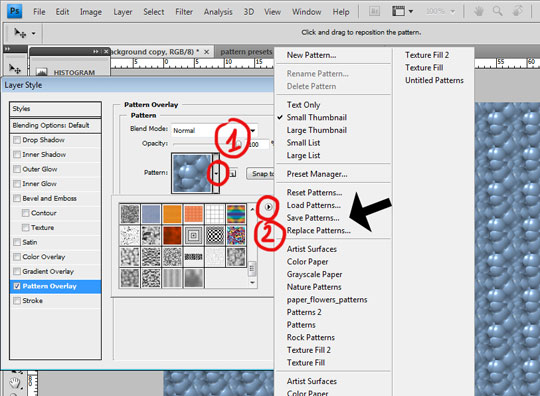
If you want to create a completely new set, click on “reset pattern” first to clear the list. Then, create your patterns, name them and once the set is created, save it.
If you ever want patterns from other sets, though, you'll have to “load” the new sets with the ability to amend the list or reset the list. If you only have a few of them, just amend them. However, if your set list is huge, you might want to reset them instead since Photoshop takes quite some time to load at the startup.
This is also why your splash screen may seem incredibly long sometimes…
In general, you can pretty much do the same things through the “preset manager”. The only difference is that you will have access to all of your presets (brushes, gradients etc...). Go to Edit> preset manager.
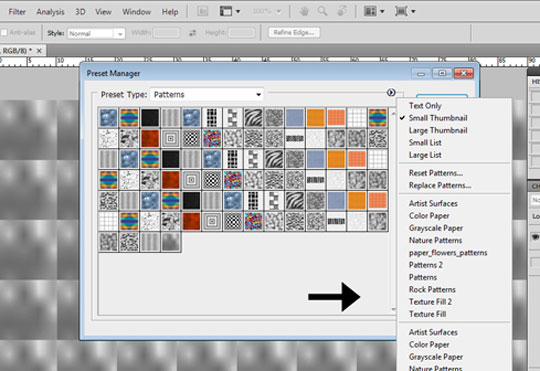
To install an existing pattern (.pat file) you have simply to put the .pat file into the folder /Users/{username}/Library/Application Support/Adobe/Adobe Photoshop CS3/Presets/Patterns (on mac OS X) or C:\Program Files\Adobe\Photoshop\Presets\Patterns (on Windows) and then “load” it as described above.
Now you're ready to learn How to realize a texture that looks like an "old cardboard" and use it to create a great vintage layout following the next tutorial When fonts and graphic effects come together to create a vintage layout. Photoshop tutorial 01
Enjoy!

Search


Photoshop, Illustrator and InDesign are ball leading design software, Photoshop being not...
At Fontscafe we know how busy you are, so we decided to create something for you that was...
Need an easy way to whip up some last-minute Christmas art?
Tada! The 100% absolutely "fre...
We've decided, in the spirit of Valentine's Day, to give away some beautiful Valentine's D...
!!!Updating October 2018:
You can find mow the "Free Chalkbard frames" directly in our "Su...